やりたいこと
最近、アーマードコア6というゲームをしたのだがそのゲームでは、PS5のコントローラーで、
左スティックの上下左右で、キャラクターを前後左右に移動し、
右スティックの上下左右で、視点を上下左右に回転していた。
それがカッコいいのでマネしたい。
イメージ
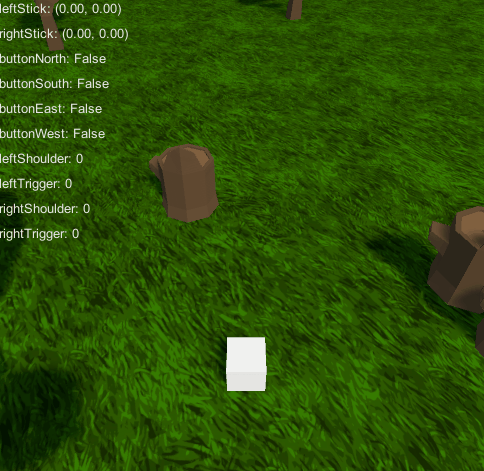
出来たのが、こんな感じ。
左スティックを上下左右、右スティックを上下左右、してる。
前提
Unity 2021.3.31f1 VisualStudio2019 Input System 1.7.0
今回の仕様
色々やり方あると思うが、今回はこんな感じでやってみた。
ただのCubeを動かす。前後左右に動かすが、CubeはただのCubeのまま。歩くモーションしたり、左右を向いたりはしない。
- ①左スティックを前後に倒すと、Cubeが前後(奥⇔手前)に進む。
- ②左スティックを左右に倒すと、Cubeが左右に動く。
- ③右スティックを前後に倒すと、Cubeを中心に、視点が上回転、下回転する。
- ④右スティックを左右に倒すと、視点が回りつつ、Cube自身も回転する。
※結果、Cubeの背中側を、ずっと見る感じになる。
やり方
Playerを追加
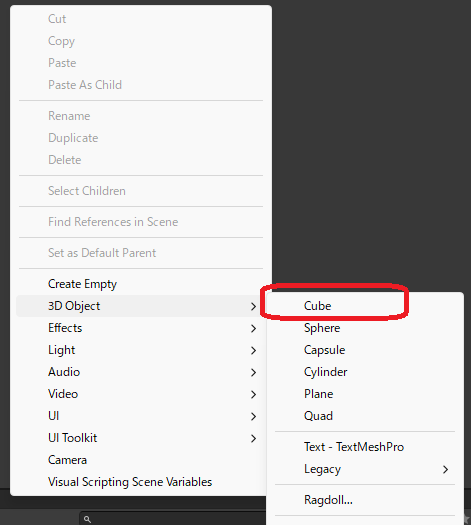
まず、HIerarchyを右クリックして、[3D Object] > [Cube] を追加する。
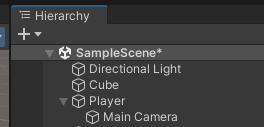
これを、主人公(Player)にする。(アーマードコアでいうところの自機のロボット)
そいつの名前を「Player」にする。
(Cubeを選んで、Inspectorの一番上に「Player」と入力する)

カメラを配置
Hierarchyの中に、MainCameraを入れる。 これで、Cubeを動かすと、カメラが勝手についてくるようにできる。
カメラの位置を、Cubeの真後ろくらいにもってくる。
こんな感じ。

## Player移動のスクリプトを書く
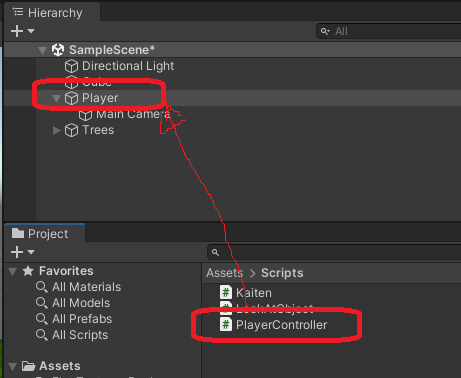
Projectウインドウの中の「Assets」の中「Scripts」フォルダを作る。
Scriptsフォルダの中で右クリックして、[Create] > [C# Script] を押して、スクリプトを作成する。
そいつを「PlayerController」という名前にする。
そのスクリプトを下記のようにする。
using System.Collections;
using System.Collections.Generic;
using UnityEngine;
using UnityEngine.InputSystem;

public class PlayerController : MonoBehaviour
{
    Rigidbody rb;
    public float moveAmount = 4.0f;
    public float jumpAmount = 20.0f;

    // Start is called before the first frame update
    void Start()
    {
        // ぶつかってきた相手のRigidBodyを取得
        rb = gameObject.GetComponent<Rigidbody>();

        Physics.gravity *= 5;
    }

    // Update is called once per frame
    void Update()
    {
        float lx = Gamepad.current.leftStick.ReadValue().x;
        float ly = Gamepad.current.leftStick.ReadValue().y;
        float rx = Gamepad.current.rightStick.ReadValue().x;
        float ry = Gamepad.current.rightStick.ReadValue().y;

        if (Mathf.Abs(lx) > 0.001f)
        {
            transform.Translate(Vector3.right * lx * Time.deltaTime * moveAmount);
        }

        if (Mathf.Abs(ly) > 0.001f)
        {
            transform.Translate(Vector3.forward * ly * Time.deltaTime * moveAmount);
        }

        if (Mathf.Abs(rx) > 0.001f)
        {
            //transform.Translate(Vector3.right * lx * Time.deltaTime * moveAmount);
            transform.Rotate(0, rx, 0);
        }

        if (Gamepad.current.buttonEast.wasPressedThisFrame)
        {
            // 真上に、相手の質量の1000倍の力を加える
            rb.AddForce(Vector3.up * rb.mass * jumpAmount, ForceMode.Impulse);
        }
    }
}
※今回やることに、キャラクターをジャンプさせる、とは書いてなかったが、このスクリプトにはジャンプさせる部分を書いてる。(消すの面倒だった)
このスクリプトを、Playerのところにドラッグして持っていき、関連付ける。
これで、上に挙げた、やること①②③④のうちの、①②④ができた。
あとは③のカメラ移動をやる。
カメラ移動のスクリプトを書く
Scripsフォルダに、「Kaiten」という名前のスクリプトをつくる。(名前は適当)
そのスクリプトを、下記のようにする。
using System.Collections;
using System.Collections.Generic;
using UnityEngine;
using UnityEngine.InputSystem;

public class Kaiten : MonoBehaviour
{
    public GameObject player;

    // Start is called before the first frame update
    void Start()
    {

    }

    // Update is called once per frame
    void Update()
    {
        float lx = Gamepad.current.leftStick.ReadValue().x;
        float ly = Gamepad.current.leftStick.ReadValue().y;
        float rx = Gamepad.current.rightStick.ReadValue().x;
        float ry = Gamepad.current.rightStick.ReadValue().y;

        // X方向に一定量移動していれば横回転
        if (Mathf.Abs(rx) > 0.001f)
        {
            // 回転軸はワールド座標のY軸
            //transform.RotateAround(player.transform.position, Vector3.up, rx);
        }

        // Y方向に一定量移動していれば縦回転
        if (Mathf.Abs(ry) > 0.001f)
        {
            // 回転軸はカメラ自身のX軸
            transform.RotateAround(player.transform.position, transform.right, -ry);
        }
    }

    void OnGUI()
    {
        if (Gamepad.current == null) return;
                                                                                        // 私のWindows+私のコントローラーでは
        GUILayout.Label($"leftStick: {Gamepad.current.leftStick.ReadValue()}");         // 左アナログスティック
        GUILayout.Label($"rightStick: {Gamepad.current.rightStick.ReadValue()}");       // 右アナログスティック
        GUILayout.Label($"buttonNorth: {Gamepad.current.buttonNorth.isPressed}");       // Y(□)ボタン
        GUILayout.Label($"buttonSouth: {Gamepad.current.buttonSouth.isPressed}");       // A(〇)ボタン
        GUILayout.Label($"buttonEast: {Gamepad.current.buttonEast.isPressed}");         // B(×)ボタン
        GUILayout.Label($"buttonWest: {Gamepad.current.buttonWest.isPressed}");         // X(△)ボタン
        GUILayout.Label($"leftShoulder: {Gamepad.current.leftShoulder.ReadValue()}");   // Lボタン
        GUILayout.Label($"leftTrigger: {Gamepad.current.leftTrigger.ReadValue()}");     // ZLボタン
        GUILayout.Label($"rightShoulder: {Gamepad.current.rightShoulder.ReadValue()}"); // Rボタン
        GUILayout.Label($"rightTrigger: {Gamepad.current.rightTrigger.ReadValue()}");   // ZRボタン
    }
}
このスクリプトで実質やっているのは、カメラの縦回転だけ。
※横回転は、Playerのほうで、Player自身を回転させることで、カメラ回転風味にしてる。
また、OnGUI()のなかに書いたコードは、コントローラー入力を見えるようにするためのデバッグ用コードなので、動きには関係ない。
ここまでで、移動とカメラの回転ができた。
できあがり
これで、とりあえずやりたいことはできた。
何の役にも立たない動きをするだけだが、何となく大満足。
参考
ほぼこちらを真似させていただいた。ありがとうございます。