もくじ
https://tera1707.com/entry/2022/02/06/144447
やりたいこと
前回、CustomControlの作り方を調べた。
その中で、VisualStateManagerというのを使って、画面の状態遷移(たとえば信号を緑から赤に切り替えたりとか)ができるというのを知った。
前回のCustomControlを、そのVisualStateManagerを使ったものに書き換えながら、勉強してみる。
前提
WInUI3 WindowsAppSDK 1.2.221109.1 VisualStudio2022
やったこと
結論、下記のコードで実現できた。
画面側のxamlコード。
<ResourceDictionary
    xmlns="http://schemas.microsoft.com/winfx/2006/xaml/presentation"
    xmlns:x="http://schemas.microsoft.com/winfx/2006/xaml"
    xmlns:local="using:CustomControlJikken2">

    <Style TargetType="local:MySignal" >
        <Setter Property="Template">
            <Setter.Value>
                <ControlTemplate TargetType="local:MySignal">
                    <Grid x:Name="MainGrid">

                        <!-- アニメーション -->
                        <VisualStateManager.VisualStateGroups>
                            <VisualStateGroup>

                                <!-- Transition -->
                                <VisualStateGroup.Transitions>
                                    <VisualTransition To="SignalGreen" GeneratedDuration="0:0:0.2"/>
                                </VisualStateGroup.Transitions>

                                <!-- 緑/赤/OFF -->
                                <VisualState x:Name="SignalOff">
                                    <Storyboard>
                                        <ColorAnimation Storyboard.TargetName="PART_SignalGreen"  Storyboard.TargetProperty="(Grid.Background).Color" To="Gray" />
                                        <ColorAnimation Storyboard.TargetName="PART_SignalRed"  Storyboard.TargetProperty="(Grid.Background).Color" To="Gray" />
                                    </Storyboard>
                                </VisualState>
                                <VisualState x:Name="SignalGreen">
                                    <Storyboard>
                                        <ColorAnimation Storyboard.TargetName="PART_SignalGreen"  Storyboard.TargetProperty="(Grid.Background).Color" To="Green" />
                                        <ColorAnimation Storyboard.TargetName="PART_SignalRed"  Storyboard.TargetProperty="(Grid.Background).Color" To="Gray" />
                                    </Storyboard>
                                </VisualState>
                                <VisualState x:Name="SignalRed">
                                    <Storyboard>
                                        <ColorAnimation Storyboard.TargetName="PART_SignalGreen"  Storyboard.TargetProperty="(Grid.Background).Color" To="Gray" />
                                        <ColorAnimation Storyboard.TargetName="PART_SignalRed"  Storyboard.TargetProperty="(Grid.Background).Color" To="Red" />
                                    </Storyboard>
                                </VisualState>
                            </VisualStateGroup>
                        </VisualStateManager.VisualStateGroups>

                        <!-- 信号の見た目 -->
                        <Grid Background="Gray" >
                            <Grid.RowDefinitions>
                                <RowDefinition />
                                <RowDefinition />
                                <RowDefinition />
                            </Grid.RowDefinitions>

                            <Grid x:Name="PART_SignalGreen" Grid.Row="0" HorizontalAlignment="Stretch" VerticalAlignment="Stretch" Margin="5"
                                BorderBrush="{TemplateBinding BorderBrush}" Background="Green">
                                <TextBlock Text="Go" HorizontalAlignment="Center" VerticalAlignment="Center"/>
                            </Grid>

                            <Grid x:Name="PART_SignalRed" Grid.Row="1" HorizontalAlignment="Stretch" VerticalAlignment="Stretch" Margin="5"
                                BorderBrush="{TemplateBinding BorderBrush}" Background="Red">
                                <TextBlock Text="stop" HorizontalAlignment="Center" VerticalAlignment="Center"/>
                            </Grid>

                            <Button x:Name="PART_StartButton" Grid.Row="2" Content="SignalStart" HorizontalAlignment="Center" VerticalAlignment="Center">

                            </Button>
                        </Grid>
                    </Grid>
                </ControlTemplate>
            </Setter.Value>
        </Setter>
    </Style>
</ResourceDictionary>
それに対するC#コード。
using Microsoft.UI.Xaml;
using Microsoft.UI.Xaml.Controls;
using System;
using System.Linq;

namespace CustomControlJikken2
{
    public sealed class MySignal : Control
    {
        /// <summary>
        /// 信号切り替わり間隔(簡単にするために、赤→青、青→赤 どちらも同じ時間で切り替わるようにした)
        /// </summary>
        public TimeSpan IntervalTime
        {
            get => (TimeSpan)GetValue(IntervalTimeProperty);
            set { SetValue(IntervalTimeProperty, value); }
        }
        public static readonly DependencyProperty IntervalTimeProperty
            = DependencyProperty.Register(nameof(IntervalTime), typeof(TimeSpan), typeof(MySignal), new PropertyMetadata(TimeSpan.FromSeconds(1)));

        private Button startButton;

        private DispatcherTimer signalIntervalTimer = new DispatcherTimer();

        public MySignal()
        {
            this.DefaultStyleKey = typeof(MySignal);
            signalIntervalTimer.Tick += SignalIntervalTimer_Tick;
        }

        private void SignalIntervalTimer_Tick(object sender, object e)
        {
            var vsm = VisualStateManager.GetVisualStateGroups(this.GetTemplateChild("MainGrid") as Grid).First();
            var currentStatus = vsm.CurrentState;

            if (currentStatus.Name == "SignalRed")
            {
                // 青信号にする
                VisualStateManager.GoToState(this, "SignalGreen", true);
            }
            else
            {
                // 赤信号にする
                VisualStateManager.GoToState(this, "SignalRed", false);
            }
        }

        // 自分でoverrideを追加
        protected override void OnApplyTemplate()
        {
            base.OnApplyTemplate();

            if (startButton is not null)
            {
                startButton.Click -= StartButton_Click;
            }

            startButton = this.GetTemplateChild("PART_StartButton") as Button;

            if (startButton is not null)
            {
                startButton.Click += StartButton_Click;
            }

            VisualStateManager.GoToState(this, "SignalOff", false);
        }

        private void StartButton_Click(object sender, RoutedEventArgs e)
        {
            var vsm = VisualStateManager.GetVisualStateGroups(this.GetTemplateChild("MainGrid") as Grid).First();
            var currentStatus = vsm.CurrentState;

            if (currentStatus.Name == "SignalOff")
            {
                signalIntervalTimer.Interval = IntervalTime;
                signalIntervalTimer.Start();
                VisualStateManager.GoToState(this, "SignalGreen", false);
            }
            else
            {
                signalIntervalTimer.Stop();
                VisualStateManager.GoToState(this, "SignalOff", false);
            }
        }
    }
}
VisualStateManagerを使う流れ
ControlTemplateの一番外側の要素に<VisualStateManager.VisualStateGroups>を入れる
下記のようにする。
    <Style TargetType="local:MySignal" >
        <Setter Property="Template">
            <Setter.Value>
                <ControlTemplate TargetType="local:MySignal">
                    <Grid x:Name="MainGrid">

                        <!-- アニメーション -->
                        <VisualStateManager.VisualStateGroups>  // ★コレ!
                            <VisualStateGroup>

                                <!-- Transition -->
                                <VisualStateGroup.Transitions>
                                    <VisualTransition To="SignalGreen" GeneratedDuration="0:0:0.2"/>
                                </VisualStateGroup.Transitions>

                                <!-- 緑/赤/OFF -->
                                <VisualState x:Name="SignalOff">
                                    <Storyboard>
                                        <ColorAnimation Storyboard.TargetName="PART_SignalGreen"  Storyboard.TargetProperty="(Grid.Background).Color" To="Gray" />
                                        <ColorAnimation Storyboard.TargetName="PART_SignalRed"  Storyboard.TargetProperty="(Grid.Background).Color" To="Gray" />
                                    </Storyboard>
                                </VisualState>
          ・
          ・
          ・
          ・
<VisualStateManager.VisualStateGroups>の中に<VisualStateGroup>を入れ、名前を付ける
まず <VisualStateManager.VisualStateGroups>の中に<VisualStateGroup>を入れる。
<VisualStateGroup>は名前を付けられている場合が多いようだが、名前なしでも動く。
今回は、シンプルな信号機としての動きを付けたいだけなので、とりあえず名前なしにした。
※一般的なControlの中の一般的な状態(PointOverとか)が入ってるVisualStateGroupには、
<VisualStateGroup x:Name="CommonStates">という名前が付けられてることが多い。というアレ。
<VisualStateGroup>の中に、<VisualState x:Name="状態名">を入れる
下記の部分。
今回は信号機なので、
- 緑信号
- 赤信号
- 信号OFF
の③状態を作った。
<!-- 緑/赤/OFF -->
<VisualState x:Name="SignalOff">
    <Storyboard>
        <ColorAnimation Storyboard.TargetName="PART_SignalGreen"  Storyboard.TargetProperty="(Grid.Background).Color" To="Gray" />
        <ColorAnimation Storyboard.TargetName="PART_SignalRed"  Storyboard.TargetProperty="(Grid.Background).Color" To="Gray" />
    </Storyboard>
</VisualState>
<VisualState x:Name="SignalGreen">
    <Storyboard>
        <ColorAnimation Storyboard.TargetName="PART_SignalGreen"  Storyboard.TargetProperty="(Grid.Background).Color" To="Green" />
        <ColorAnimation Storyboard.TargetName="PART_SignalRed"  Storyboard.TargetProperty="(Grid.Background).Color" To="Gray" />
    </Storyboard>
</VisualState>
<VisualState x:Name="SignalRed">
    <Storyboard>
        <ColorAnimation Storyboard.TargetName="PART_SignalGreen"  Storyboard.TargetProperty="(Grid.Background).Color" To="Gray" />
        <ColorAnimation Storyboard.TargetName="PART_SignalRed"  Storyboard.TargetProperty="(Grid.Background).Color" To="Red" />
    </Storyboard>
</VisualState>
コードの方にVisualStateManager.GoToState(this, "状態名", false);を書く
前回のCustomCotnrol作成の記事のほうで、カスタムコントロールのC#コードの中で、具体的にGridの色を指定していた部分を、VisualStateManager.GoToState(this, "状態名", false);に変える。
おわり
以上で、VisualStateManager.GoToState(this, "SignalGreen", false);としたら、xamlの<VisualState x:Name="SignalGreen">のところで指定した対象と色に変わってくれる。
SignalRedやSignalOffの状態(VisualState)も同じ。
ハマったポイント
TargetPropertyの指定の仕方
Storyboard.TargetProperty="(Grid.Background).Color" To="Gray" の部分を、最初
Storyboard.TargetProperty="Background" To="Gray" にしていて、
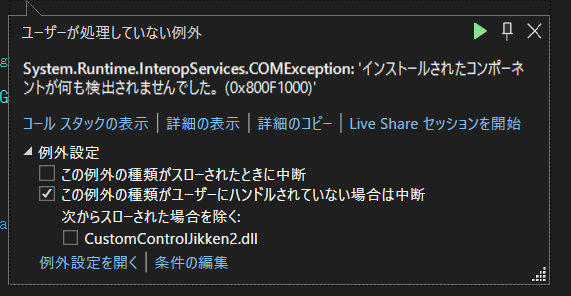
ずっとこのエラーになってた。
だいぶ昔に書いた、WPFのこの記事のことを思い出して、(Grid.Background).Colorを試して、うまくいった。
※ただ、なんでこれでうまくいくのかが、正直もうひとつしっくりこない。。 (Grid.Column)のように、かっこを付けるのは、それが「添付プロパティ」のとき、という話があるが、Backgroundは添付プロパティではないような気がする。。。
上の以前の記事をかいたときの自分は、これ理解したのだったか。。。?
→とりあえず、Storyboard.TargetProperty を設定するときは、「"(Grid.Background).Color"」のように、"(出所.プロパティ)"と、正式?な書き方をすれば間違いない、と思っておく。。。
あらかじめ対象のGridのBackGroundを指定しておかないとエラーになる
これは、上と同じ以前のWPFのこの記事で書いたほぼそのままなのだが、あらかじめ対象のGridのBackGroundを指定しておかないとエラーになった。
具体的には、
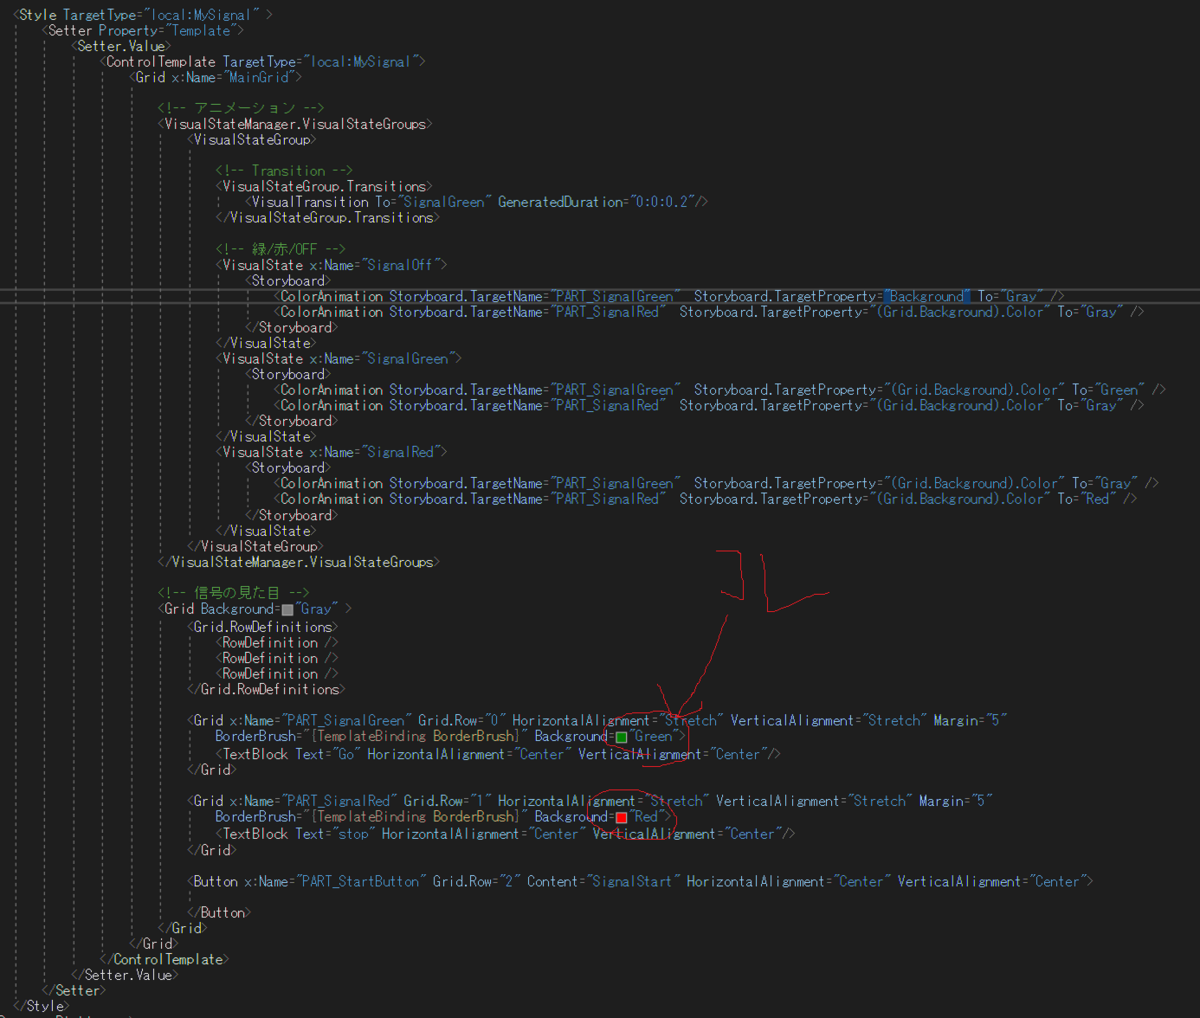
ここのBackgroundになにか入れておかないと、
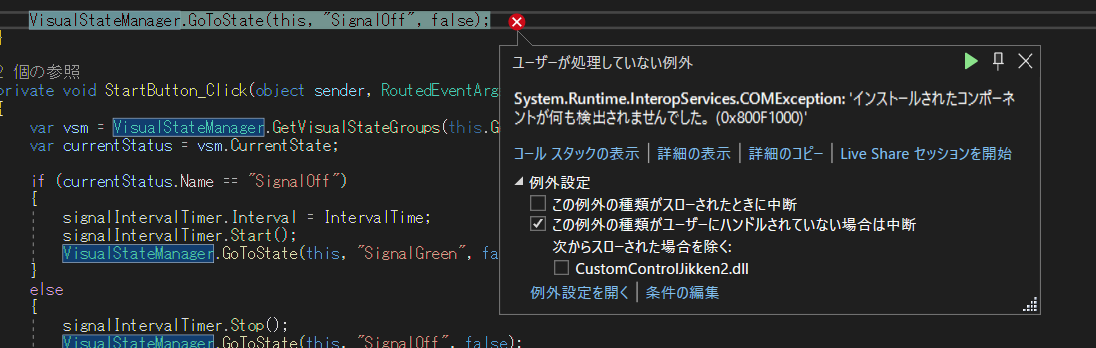
こういうエラーが出た。理由は、上の以前の記事に書いた通りと思う。
メモ
VisualStateGroup を調べてると「CommonStates」というのがやたら出てきて、それが「一般的なControlの状態」とか言われるが、どういうこと?
存在してる、ほとんどのControlが、CommonStatesという名前のVisualStateGroupを持っているらしい。
じゃあ自分で作ったCustomControlに、そういう名前のVisualStateGroup を作って、PointOverとかの名前を持ったVisualStateを作ったら、その通りの動き(マウスオーバー時の動き)をしてくれるのか?
→そうじゃないっぽい。
あくまで「VisualStateGroup 」というのは名前で、複数コントロールで「CommonStates」という名前のVisualStateGroup が存在してるのは、いうなればたまたま。
CommonStatesの中のVisualStateに、NormalとかPointerOverとかの、複数コントロールで共通したStateがあるのもたまたま。 一般的な各コントロールに、同じような状態があるから同じ名前を付けただけ。
⇒たまたま、ほとんどのコントロールに、そういう同じVisualStateGroup、VisualStateがあるから、ほとんどのコントロールで同じ書き方をすれば、各状態に対して制御を行うことができちゃう、という感じ。 (一般的なコントロール(例えばButton)のデフォルトのTemplateをみると、ほとんどのCotnorlに、確かにそういうVisualStateがある。)
で、一般的なContorlの中身(c#?コード)の中で、今回やったのと同じように、VisualStateを遷移させるような処理をしてるのだと思う。(.NETのgithubまでは見てないが...)
CommonStatesは大体のコントロールに含まれるという割に、それ以上のことが調べても全然でてこないのは、
たまたま同じという感じだから、MSの公式に、「CommonStatesにはこういうStateがある」的公式説明がないのだと推測。。。
(そういう公式ドキュメントがどうしても見つけられなかった。。。)
で、いざVisualStateGroup やVisualState を使って実装をしたい(例えばマウスオーバー時にBackgroundの色を変えたいとか)となったときには、 対象のコントロールに、実際にどういうVisualStateGroup があるのか、VisualStateGroup にCommonStatesがあるのか、とかを確認しようと思うと、そのコントロールのデフォルトのテンプレートをみるのがよさそう。
デフォルトのテンプレートのありか(generic.xamlのありか)は、下記を参照。
https://tera1707.com/entry/2022/10/02/235818
※たぶん、各コントロールのcsコードの中で、VisualState のx:Nameで名前指定した状態に、遷移を行っているのだと思う。(VisualStateGroup の名前は使われてなさそう?CommonStatesを、テンプレートの中でCommonStatesAAAAとか変な名前にしても、普通に動くので。VisualState を変な名前にすると動かなくなる)
要するに、一般的なコントロールの見た目をカスタムしたいときは、 デフォルトのテンプレートに書かれてるVisualState を使って、 動き(Backgroudnの色とか)を指定してやればOK。
自前のCustomControlを作ったときに、見た目の状態船員をしたいときは、今回のような実装をすればOK。
メモ2
VisualStateManager.GoToState(this, "SignalOff", false);の3つ目の引数をtrueにすると、
xaml中の<VisualStateGroup.Transitions>が有効になる。
今回のコードだと、下記の部分が有効になり、
<VisualStateGroup.Transitions>
    <VisualTransition To="SignalGreen" GeneratedDuration="0:0:0.2"/>
</VisualStateGroup.Transitions>
SignalGreenの状態に遷移するときだけ、0.2秒で状態遷移が行われるようになる。
falseにしてると、そうはならない。(ほかの状態と同じように、デフォルト?の動作をする)
参考
前回、CustomCOntrolを作った記事
https://tera1707.com/entry/2023/06/16/135543
WPFでアニメーションをしたときの記事
https://qiita.com/tera1707/items/ee6d72bb68a8e2131082#%E5%88%A5%E3%81%AE%E4%BE%8B
ms公式 VisualStateManager Class
CommonStatesが持ってるVisualState
公式情報を見つけたいのだが、どうしても見つからない。
それ以外の情報についても、下記ページわかりやすい。
https://atmarkit.itmedia.co.jp/ait/articles/0907/13/news093_3.html
.NetFramework4.8情報なので古いが、なんか手掛かりになりそう?↓
コードからこの辺をやるときも参考になりそう